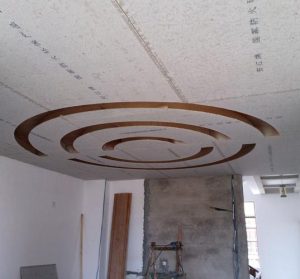
The new room decoration hanging flat ceiling feels too old-fashioned, the designer gave me the design of the curved ceiling. What surprised me was the skill of the carpenter, it was so good that I couldn’t help but share it with everyone, like the praise of a ha!
First look at a picture of the construction, such a curved ceiling construction difficulty is not very high?
Although I think the flat ceiling is too old-fashioned, but see the curved ceiling design, and inevitably worried about cracking, the master patiently sketched for me to explain, said his construction to do the ceiling, 50 years do not have to worry about cracking.
At first look at the design, still do not understand, but the carpenter is very patient, directly with sketches to explain to me the details of construction.
The middle of the first hanging a small piece of flat roof, nine percent board to seal, and then do the following top, the last side of the arc slope to do.
The circular surface measurement sawing arc woodworking board file, forty centimeters a file, according to the curvature of the curved surface should be sealed five plywood more appropriate.
[Household ceiling construction steps]
To do a good job arc ceiling, the first step should be done to put the line, bullet line, construction will be standard.
Play line equipment
After the line, the line work is done, that is according to the line nail wood square.
See the following chart of the black point of things? After the wood square stare good need to play expansion screws.
Expansion screws are generally steel row nails, there are 38 steel row nails and 50 steel row nails. In order to fix the strong, the master used 50 steel row fixed (specific site decision, some 50 steel row fixed too long, fixed not into).
After the steel nail is done, is hanging hanging plate (above), if the window next to the need to install the curtain box, generally do the curtain box first, and then do the pendant light trough of the vertical plate.
This is the light trough plate, generally with 90 cm wide Oh! (Above)
Next is the installation of light steel keel, to be fixed, remember to straighten the light trough plate Oh!
The above is the light trough blocking board, the above need to cover nine percent board, cover the board should not be greater than the width of the blocking board, also need to paste plaster line. Some decoration companies will also require the outside of the ceiling board to paste a layer of Ette board.
Use the Ette board to do the sealing board, the corner of the place must be seven sub-cut corners, to avoid the crack over time. The joints of the Ettel board should leave a gap of about 3 cm, so that the painters can fill AB glue. The corner place must be seven sub-corner, to avoid uneven stress cracking on the four sides of the ceiling.
The next step is to spray paint, apply eye rustproof paint, install lamps and lanterns, etc..
In this way, my home curved ceiling is ready, waiting for surface decoration and lighting installation.
Every day I go to the construction site to see the carpenter construction, I think their workmanship is too good, I can’t help but sun out, give them praise!

