Residents are less and less aware of the specific decoration items in the home decoration process, and there are more and more installation disputes. Therefore, knowing the installation steps in advance before installation can make the construction personnel feel at ease when installing and constructing. Today, let’s learn about the toilet tank accessories and how to install the toilet tank together.
What are the toilet tank accessories?
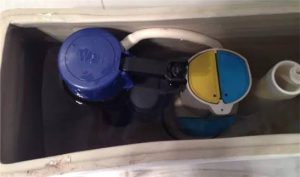
The accessories of the toilet tank are called “the heart of the toilet”. The accessories of the toilet tank mainly include: water inlet valve, drain valve, button.
1. Classification of toilet tanks: one-piece type and split type.
2. Water inlet valve classification: side water inlet, bottom water inlet, rear water inlet.
3. Drain valve classification: double press type, hanging chain type, bucket type.
4. Button classification: side button, top button, front button.
How to install the toilet tank
1. First of all, we need to determine the installation position of the water tank
Align the sewage outlet at the bottom of the toilet with the drainage pipe under the ground to determine the installation position of the toilet tank. Drill holes with a percussion drill to a depth of about 5cm. Note that the sewage outlet of the toilet must be aligned with the sewage pipe under the ground, otherwise it will affect the sewage discharge effect of the toilet and even cause water leakage.
2. Install the flush toilet base
First put the steel expansion bolts into the drilled holes, connect the bottom corner of the toilet with the steel expansion bolts, after the connection is completed, tighten the screw nut on the toilet to fix the toilet. After fixing, seal the surrounding area well.
3. Install the toilet tank
Before installing the water tank, you need to drill a hole on the wall according to the height of the water tank. After the hole is drilled, fix the water tank on the wall with steel expansion bolts in the same way, add a nylon washer, and tighten the screw.
4. Install the connecting pipe
After the toilet tank is installed, the connecting pipe between the water tank and the toilet base, the connecting pipe between the water inlet pipe and the bottom of the water tank need to be installed next. And pay attention to adding a water inlet control valve at the connection of the water inlet pipe.
5. Install the float in the water tank
Open the water inlet valve, observe the water inlet volume and water inlet height in the water tank, and adjust the height of the float in time.
6. Check for water leakage
After all the above are installed, it is necessary to check the sewage discharge capacity of the toilet and each interface to see if there is any water leakage.
7. Install the toilet seat and toilet cover
Finally, install the toilet seat and toilet cover. At this point, the whole toilet is installed and can be used normally.