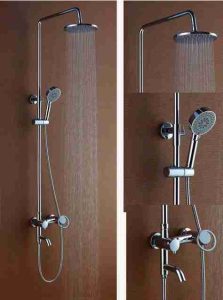
After the faucet is installed, it must be horizontal and not inclined, about 900-1100mm from the ground. When installing the faucet with a wrench, be careful not to damage the plating surface.
Shower installation 4. As shown in Figure 2, drill three holes with a diameter of 6mm and a depth of 35mm at a position about “H” away from the faucet outlet joint;
Shower installation 5. Insert expansion pipes into the installation holes, and fix the wall mount to the wall with self-tapping screws. Note: The wall seat must be on the same center line as the faucet outlet joint.
Shower installation 6. Wrap the faucet with cloth 9 before drilling to avoid the faucet from being soiled and scratched.
Shower installation 7. The height “H” needs to be determined according to the actual product during actual installation.
Shower installation 8. As shown in Figure 3, insert the sealing ring C into the lower end A of the switching valve.
Shower installation 9. Tighten the lower end A of the switching valve and the upper end B of the faucet through threads.
Shower installation 10. Wrap the faucet with cloth 9 before drilling to avoid the faucet from being soiled and scratched. Note: Be careful not to damage the electroplating surface when tightening with a wrench.
Shower installation 11. As shown in Figure 4, tighten the B end of the shower rod 3 and the C end of the switching valve through threads (the B end of the column shower rod 3 must have a sealing ring 5).
Shower shower installation 12. Put the decorative cover 2 into the A end of the shower rod 3, then insert the A end into the wall seat 1, lock the A end with three setscrews 4, and finally push the decorative cover 2 to the wall;
Shower installation 13. After installation, turn on the water inlet switch and rinse the pipe thoroughly.
Shower installation 14. Connect the nut end A of the shower hose to the joint B behind the switching valve body, connect the nut C to the D end of the hand shower and insert J into the shower seat 2 (Note: the shower head Both ends of the hose must have gaskets①
Shower installation 15. Tighten the top spray 3 to the shower rod.